Star News


Crochet boots for beginners with step by step. Knitted boots
Knitting boots for the house or the street is not so difficult, especially if you do not use complex patterns when creating them. How to crochet boots for beginners with step by step description and diagrams, see below.
We prepare materials
First you need to prepare the necessary materials. The yarn can be woolen, half-woolen, acrylic, cotton, mixed. It is chosen depending on the season for which the boots are knitted, their patterns and models. The hook should be the same thickness as the thread, or 1.5 times as thick.
The pattern of the pattern can be different. There are also very difficult ones for experienced craftswomen and very simple - for beginners.
The more crochets in the scheme, the more delicate the product will turn out. It is better to choose such models for the summer.
Boots can be made from ready-made motifs, for example, from grandmother's squares. For them, you need to pre-impose the required number of fragments and connect them to the sole and to each other using a thread and a needle or connecting posts.
The sole can be simply tied. But you can use denser materials. For example, leather, felt, rubber.

For boots with an insole, you need to purchase them one size larger than the desired size. Use an awl to make holes at a distance of 0.5 cm from the edge of the insole and from each other. Tie the entire insole along the edge with single crochets through the holes obtained. In this case, knit 2 columns in each hole. The insole can be tied with yarn on top to make it softer and denser. You can also add a synthetic winterizer between the leather and the knitted layer. This is especially true in boots for a baby.
More often, not a leather insole is used for these purposes, but a felt one. It is also selected one size larger and tied in the same way. For boots with felt soles, synthetic winterizer can be omitted.

If shoes for the street are knitted, then the sole can be borrowed from sneakers or slippers. It is desirable that it be rubberized. Then it is easy to pierce it with an awl and tie it up.

For the little ones
Knitted baby boots are called booties. They can be thin and delicate for summer, or thick and warm for winter. These shoes are especially suitable for newborns - warm, comfortable, lightweight. The sole can be simply knitted or felt. The yarn is as natural as possible, but not prickly, but soft.
Step-by-step description with photo:

Dial 15 air loops(VP). Insert the hook into the 4th loop of the chain from the hook and knit 3 rows according to the pattern:

In a different color, knit a single crochet in each column. As a result, there should be 56 loops. Tie the fifth row in the same way.


With the color that the sole was knitted with, start knitting bumps (2 VP, 2 unfinished columns, 1 VP).

Skip 1 loop and tie another bump. Link 1 VP. And thus finish the whole row.

Also tie 7 row.


Marking the middle, start knitting the toe with white yarn. Insert the hook into the back wall of the loop and tie a white knob out of 2 unfinished loops. Then knit them from 3 unfinished loops to the middle. There should be 14 pieces. Tie the last knob from 2 unfinished loops.

Expand knitting and continue knitting bumps (7 pcs.). Connect them.


Tie 4 bumps. Also finish the row.

In this way, tie 2 more rows and change the color. Knit 3 VP in each column.


For adults
In this master class, knitting of boots from hexagons is considered. Boots are suitable for adults. The size can be changed by increasing or decreasing the hook number.

Pattern and description of knitting motive:

Pattern and description of knitting soles:

Assembly and diagram of the upper bar:

This model can be of any desired height. Depending on the number of motives, footprints or boots are obtained.
Grandma's way
Another way to knit boots from motifs is to use grandma's squares. Patterns for knitting them can be any complex and simple, monochromatic and multi-colored.

First you need to tie the felt insole. Tie 3-4 rows of single crochet stitches.

Tie 26 motives according to the scheme you like. Each boot will need 13 pcs. At 37 foot size, the squares must have a side of 8 cm.Examples of schemes:


In this master class, 8 pink and 18 gray motifs are connected. Tie two sides of two gray squares with an additional row of double crochets.

Expand the motives, as in the picture:

Sew the squares into strips, and then the strips - together. Sew one of the squares with an additional row of double crochets between motifs 9 and 12.
If suddenly the boots are a little small, along the same square they can be increased by adding rows of double crochets.

Sew the boot to the sole with a stitching seam from the wrong side. Tie the top of the boot with a reverse row of single crochet posts.
Insert a cord into the boot, sew pom-poms. Also perform the second one. And the boots for the house are ready!
Related videos
Visual master classes on crocheting boots on the video:
Summer openwork boots have been filling fashionable models shop counters. But sometimes it is very difficult to choose such shoes for the leg, but you want to be in trend.
There is an exit. Crochet stylish boots yourself, choosing your favorite yarn, style, colorful accessories for decoration.
How to crochet home boots
First, try making simple indoor boots, and then move on to more complex styles. Prepare for work: woolen yarn or acrylic - 100 gr, hook number 3, awl, felt insoles. The boots will be mounted from 10 hexagons, five per leg. Knit motifs in a circle, weaving threads of different colors.
We knit motives
Designations: c.p. - air loop, art. b / n, st. s / n, st. s / 2n. - a column without a crochet, with a crochet, with two crochets.
- Dial 6 vp, close in the ring.
- The first fragment - 4 vp, 15 sts / 2n.
- The second fragment is 2 vp, 17 lush columns.
- The third fragment - 2 vp lifting, yarn. Farther embossed columns round.
- The fourth fragment - vp 3 lifting + 2 st.s / n. in the arch, 3 tbsp. into the next two arches, repeat to the end of the row.
- Fifth fragment - 1 vp lifting, 3 st./n. in the same loop, 1 st.b / n. in the next 10 loops. Then 3 st.b / n. in 11 loop.
If in doubt, see the diagram.
We decorate the upper part of the boots
Having knitted all the motives, collect them 5 pieces in a boot. Connect the parts together with single crochet. Begin to fasten the product from below, taking two blanks on the heel, one on the toe, folded in the middle. The remaining two pieces will go to the bootleg. Motifs can be of any color, depending on your preference.

We collect boots
- Take the insole over your foot.
- Poke holes with an awl along the edge of the workpiece with a distance of 1 cm between them.
- Tie the insole according to its shape with regular posts in three rows.
- Tie the workpiece to the st.b / n soles.
Cozy boots are ready. They are perfect for a dressing gown, giving piquancy and zest to everyday clothes.

How to crochet fishnet boots
Knit light summer boots from mixed or rayon threads. They will need about 150 grams, depending on the height of the bootleg. Also prepare a thick needle, awl, crochet hook, and ballet flats to form the base of your boots.
- Stitch the outside of the shoes with a chain stitch, making stitches 0.5 cm from the sole.
- Knit round st.s / n. - 8 rows, if necessary add or decrease the number of loops.
- Arrange the toe and heel with st. From 2 / n.
- Baste the top, tied with the selected pattern, to the ballet flats.
- Decorate the top of the product with a tapered border so that the boots do not slip from the shin to the heels.
Tip: soak the product for a quarter of an hour in a starch solution and it will keep its shape for a long time.


Patterns for crocheting boots
Once you understand the principle of making shoes, take on the harder job. Check out our selection of models, dream up with jewelry and get a pair of exclusive boots.
Solid lace boots
Make such bundles from cotton yarn with lavsan. Cut off the textile upper from the sports slippers - the outsole is ready. Then decorate the instep, sidewalls, heel with crochet columns and get a shoe to which you attach the bootleg. An openwork tube is made from separate pieces of lace, which are joined in the process.


Lightweight cotton yarn boots
If you have old moccasins, transform them into graceful boots by cutting off the straps and tying the base like patterned booties. Knit the boot in a circle with the desired pattern.
If dirty, wash the bundles in warm soapy water. After rinsing, starch.
Tip: dry the boots without squeezing, pulling them on plastic bottles with cold water.

So the job is done. Put on and wear a new thing with what you want: dress, shorts, jeans - and you will look bright, stylish, unusual.
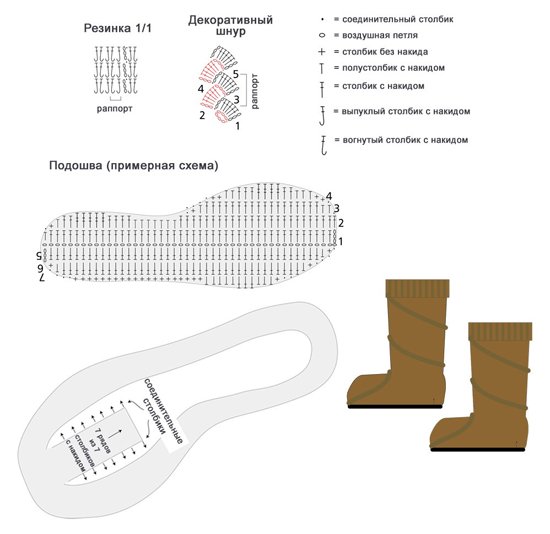
Boots Brown color crocheted
Size: boots in the photo are size 36, but the description allows knit boots any size.
You will need:
1 skein Camila yarn (100% mercerized cotton, 1000 m / 100 g)
2 skeins of Camila Brilhante Fina yarn (100% polypropylene, 500 m per skein)
Hook 2 mm
2 soles with insole
Shoe glue
Elastic 1/1: knit in circular rows according to the appropriate pattern
Decorative cord: knit according to the appropriate pattern
Knitting patterns:
WORK DESCRIPTION:
Boots are knitted in 2 threads (1 thread Camila + 1 thread Camila Brilhante Fina).
Before knitting, fold 2 threads together, unwind a small ball (thread approx. 30 cm long) and set it aside for now.
The finished sole consists of 2 parts: the sole itself and the insole. Separate the insole from the sole. Make a pattern for the top of the sole.
General instructions for knitting soles: make a chain of air loops along the length of the pattern and first knit one half of the sole. The diagram shows how, when knitting, you can repeat all the bends of the pattern, performing columns of different heights. You can also crochet stitches with 3 crochets and / or knit 1-2 more rows. Optionally, you can knit the sole only with single crochet posts.
Attention! No knots are needed when knitting soles! To knit the second half of the sole, pull the thread through the last knitted stitches and make the initial connecting post. When finished knitting the sole, pull the thread through the last knitted stitches and cut the thread.
Attach the thread to the middle of the notch on the inside of the sole and knit perpendicular to the sole in circular rows with double crochets.
In the 1st row, knit 1 double crochet in each loop of the sole, you do not need to perform any decrements or additions.
In the 2nd row, mark the edges of the sock on the sides and subtract 1-2 loops in these places (knit 2 double crochets together), forming the toe of the boot.
In the 3rd row, repeat the decrements on the toe, and also evenly subtract 3 loops (knit 2 double crochets together) on the back of the boot, forming the heel.
Do not break the thread!
Advice : as you knit, write down all your steps so that you can repeat them later for the second boot.
Attach the thread from a separate glomerulus to the right of the 7 central loops of the sock and tie 7 rows in the forward and reverse directions on these loops, forming the front part of the boot (attach the ends of the rows to the sides using connecting posts). Break off additional thread.
Continue knitting with main thread. Tie 4 circular rows around the "entrance" of the boot. In the next 7-8 rows, decrease 3-4 sts evenly in each row until the "entrance" to the boot becomes just a little more than the ankle circumference so that the leg can pass into the boot. Work 2 rows straight. Next, in each row, add 2 sts evenly (knit 2 double crochets in one loop of the previous row) until the circumference of the boot matches the circumference of the lower leg. When performing these additions, you should be guided by your size and, if necessary, do them more or less often. The height of the boots in the photo is 22 rows of double crochets, starting from the instep of the leg. You can change this height at your discretion.
Lapel. Tie 6 circular rows with 1/1 elastic without additions or subtractions, end 1 with a row of single crochets. Turn outwards.
Decorative cord. Knit according to the appropriate pattern. The length of the cord in the photo is 60 cm. The length of the cord may be more / less depending on the number of turns around the boot.
Assembly and finishing:
Sew the cord onto the boot, starting at the bottom of the side and going up around the boot.
Glue knitted sole to the finished sole and let dry well.
Insert the insole into the boot.
Knit the second boot symmetrically to the first.
Advice: after the glue has completely dried, so that the boots do not slide down the leg, the knitted part can be starch.
Knitted items, especially shoes, have always attracted attention. You can crochet or knit wonderful boots. For novice craftsmen, there are many schemes with step-by-step descriptions that will help you make slippers, boots or boots with your own hands.
Knits, especially shoes, have always attracted attention.
Knitted experienced needlewoman home boots must be praised... But a novice needlewoman is recommended to use detailed diagrams such work.
The "shoe" type of knitting cannot be called easy, which is why, in order to make shoes like slippers or boots at home, it is important to follow the instructions step by step.
- First you need to prepare materials for work. It is recommended to use semi-woolen yarn. The product from it will not wear off for a long time and will be quite warm. You should also choose a hook and insole. Any insole will do.
- The technique of work in this case is knitting with motives. It is necessary to knit hexagonal motifs, 5 for each boot. In total, we knit 10 motives.
- The chain is made of 5 air loops, which then need to be closed in a row.
- Further, to lift the work in each subsequent row, 4 air loops should be added.
- To make the shoes look openwork, the loops need to be knitted with crochets. But there should not be too many of them, otherwise the product will not be warm.
- When 5 rows have been knitted, you can continue knitting with a different color of yarn. This will make the work look more attractive. But this is optional.
- To knit a regular hexagon, you should pay attention to the working diagram (below).
- Next, all 5 motives need to be connected. Stitching occurs on the wrong side to mask the seam. The posts are tied without a crochet.
- On the sole, you should make a circular motion with an awl. A total of approximately 50-55 holes should be made.
- Then the insole is knitted with yarn in two rows.
- Slippers are tied to the insole.

Crochet slippers for beginners
Such a product is very practical, especially in winter. If you wear these slippers at home, your feet will hardly freeze. The same children's slippers can be knitted in the summer.
Master Class:
- First you need to prepare insoles, which will become the basis of future slippers. They are pierced with an awl. This is done in order to be able to thread a thread through the holes and sew the insole to the product. About 50 holes are made.
- Then yarn is threaded through each hole. In each hole, 2 posts are made. It is important to knit the second slippers with a thread symmetrically.
- A thread is threaded into the back wall of the loop and tying begins along a row of ordinary posts. Nakida is not done.
- So you need to knit 3 circular rows. Loops in a row are not added. The thread then breaks off.
- Then a different color of yarn should be used in the work. This will decorate the product. With such a yarn, the previous two steps are repeated.
- Next, straight rotary rows are knitted. The product should lift up. Knitting takes place on 8 front loops, which are in front.
- Next, the yarn is connected to the edge of the slipper. All stitches are crocheted without crochet. It is recommended to try on slippers at this stage.
Optionally, you can decorate the product, for example, with embroidery.
How to crochet slippers-boots (video)
DIY shoes with soles: we knit cute boots
Knitted shoes with soles are considered to be as durable as possible. It is durable, as the outsole hardly wipes.
Work on such a thing should consist of the following sequential stages:
- The first stage should be preparation necessary materials and tools. It is not recommended for beginners to knit boots with yarn soles. different colors, since it will be much more difficult. In addition to the yarn, a hook, a large needle, an awl and, in fact, a sole are prepared. It is better to use a rubber sole as a basis. Why rubber? Firstly, it is durable, and secondly, it is quite easy to pierce it with an awl.
- In order for the product to be warm and dense, it is recommended to knit it in a thread folded in half. Alternatively, you can use 2 skeins of yarn at once.
- A chain of air loops is knitted. The chain should be equal to the distance from the toe of the slipper to the tongue. Beginners are advised to tie a chain 2 cm more than this distance.
- The row is knitted with ordinary pillars. Nakida should not be done.
- Further, the number of loops is increased by adding 2 additional loops in a row. In the place where the sock decreases, the loops should no longer be added.
- Places on the product in which the loops need to be reduced are pierced with pins. At this stage, it is recommended to immediately make the same part for another boot. They should turn out to be the same.
- The back of the product is knitted. Work begins with a set of chain stitches. Then the 2 parts are connected together.
- With the help of a large needle, the sole is stitched, in which holes were previously made with an awl. Then the stitches are crocheted.

Knitted shoes with soles are considered the most durable.
At the last stage knitted product should attach to the sole-base.
What materials should be prepared?
- Yarn. A semi-woolen yarn is considered universal for knitting boots. But if desired, the master can use another, for example, a double or acrylic thread.
- Awl. A rubber sole or insole is pierced with it.
- Big needle. Thread stitches are made with a needle on the sole.
- Hook. Crocheting is the knitting of pillars and motifs.

A semi-woolen yarn is considered universal for knitting boots.
Basic rules for knitting shoes
- You should not use substandard materials in your work. A beautiful and practical product can be obtained only if the master has given preference to good material. If he has a desire to carry boots, boots or slippers for a long time, then he should not save on yarn.
- It is recommended to use a small crochet hook for knitting openwork sections and motifs. Openwork knitting will allow the product to blow well. But if the master has a desire to knit winter slippers that he needs to warm his feet, then you should not knit in an openwork way.

Do not use substandard materials in your work.
In order to knit shoes that would fit well in size, it is important to first take measurements from the foot. Knitting "by eye" will not work here. It is especially important to observe this rule when knitting products that fit tightly to the leg, for example, ballet flats.
- As a sole-base, you can use not only the cut-out bottom of the shoe, but also the insoles. On sale you can find insoles with sheepskin, which are perfect for winter products.
- It is recommended to use glue for the knitted shoes to adhere better to the base sole. You need to wear shoes only after it is completely dry.
- You should not sew your shoes to the sole with ordinary threads. They are not strong enough. Better to use twine.
- The awl should always be used in such work. This tool is very convenient for making holes in the sole through which the yarn is pulled.
For knitting winter boots, you can use moccasin soles as a base.
Crochet booties (video)
Thus, step-by-step execution all points of the work plan will help a novice master achieve success and knit beautiful, and most importantly, practical shoes, felt boots or shoes for himself or another person, you can also knit on a felt sole.
Good afternoon friends!
Today we have our last competition work - crocheted boots from hexagons, which was presented again by Larisa Sankevich.
Although these are not exactly slippers, in principle, they are also house shoes. Very nice and easy-to-use comfortable boots with felt soles.
There will be diagrams and descriptions, so you can make yourself such an unusual and stylish shoe.
How to crochet hexagon boots
I used half-woolen yarn, still post-Soviet, with the addition of polyester thread for strength and durability.
Hook - # 4.
Boots are knitted and assembled from hexagonal motifs... In total, you need to knit 10 motives (5 pieces for each boot).
Let's start with them.
Hexagonal motives
The pattern of crocheting boot motifs is in front of you.

In the first three rows, we knit a flower with columns with one crochet.
In the fourth - sixth rows, tying the flower with columns, we get a hexagon.
We knit rows 1, 4-6 with a thread of one color, rows 2 and 3 - another.
The resulting motive goes to size 36-37. If you need more (you can attach it to the finished insole), then I add the height of the loops in 5-6 rows: instead of a half-column with a crochet, I knit a column with a crochet, or I knit another 7th row.

Assembling motives
We sew the motives together with single crochets in the order indicated in the following diagram.

On the bottom edge of the boot, we knit 2 rows with single crochet, and in the stubs between the motifs - with double crochet, on the toe, you need to add 2 loops in each row.
I make a strapping along the upper edge of the boot.

Sole
As a basis, I take ready-made felt insoles of the right size.
I put on a chain of about 20 loops (depending on the size) and on them I knit an oval in a circle with double crochets (3-4 rows) until the width of the oval becomes equal to the width of the insole.
Then I attach the thread in the middle of the oval and knit in rows back and forth only the sock, trying on the sole to the insole and performing additions where necessary.
The last row is around the entire circle to align the edge of the sole.

I sew the sole to the boot, then turn the boot inside out and sew a felt insole to the sole.
When worn, the built-in insole does not move, does not break. You can also make the soles like in tank-slippers, but I like the purchased insoles more (they come with a rubberized layer, and with a water-repellent cellophane layer).
 These are the wonderful homemade boots made by Larisa from hexagons on a felt sole.
Thank you, Larisa, for participating in the competition and for the wonderful things done with your own pens!
Friends, our competition is over. I really liked him! A little more patience and literally one of these days I will publish the results.