Star News


Cross knitting: MK knitting clothes for the whole family with step-by-step photos and video tutorials. Cross Elastic Bands Cross Knitting for Kids
In today's master class, we will consider the common cross knitting with knitting needles. In their way, you can knit things for the whole family: for children, for men and women. This master class will be useful for both novice needlewomen and experienced craftswomen, since in it we will try to describe in detail and clearly present the issue under study.
We study cross knitting of a vest with diagrams and descriptions
Introducing the option of knitting a vest with sleeves. The vest, considered as an example, is suitable for girls wearing sizes 42 - 44.
In order to knit a vest, you will need the following materials:
- Light green yarn - 350 g (requires 40% cotton, 40% polyacrylic, 20% polyamide and 85m / 50g);
- Knitting needles - No. 8.
The main knitting pattern is a chain of removed loops.
The knitting pattern is shown in the diagram.

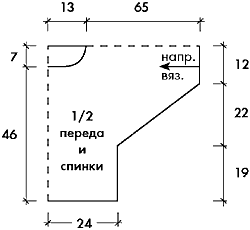
We will tie the back of the future vest. Take the knitting needles and cast on 18 loops. You need to knit with an elastic band 1 by 1 two rows, and then you need to knit 12 rows with the main pattern. At the end of the purl row, cast on 26 additional loops and continue to knit all 44 loops with the main pattern. When row 86 is reached, close 26 loops and continue knitting with the main pattern. The 101 row is closed with an elastic band.
The shelf is knitted as follows: first, we collect 39 loops and knit with an elastic band two rows, and then use the main pattern. In order to form the neckline, it is necessary to add one loop five times in rows 11, 13, 15, 17 and 19. At the beginning of the 39 front row, close 26 loops and knit with the main pattern up to 50 rows, 51 and 52 rows are knitted with an elastic band, and at 53 we close 18 loops.
When all the details of the vest are ready, you need to sew them.
To process the neck of the vest, you need to dial 51 loops along the neck and knit 4 rows with an elastic band, then close all the loops.
Let's try to create a warm pullover with a step-by-step master class
Cross-knit makes a great pullover for women. Model presented suitable for girls, which are 44 -46 sizes. In order to knit a pullover you will need:
- Yarn - 1200 g;
- Straight needles # 10;
- Circular knitting needles # 10.
We knit the pullover with a wavy pattern, which is performed as follows: the number of loops must be strictly multiple. The main pattern will be knitted according to the pattern below.

The pullover is knitted across from two pieces. We begin to knit the product from the right sleeve. Cast on 38 stitches and knit with a wavy pattern. On the diagram, all actions are detailed. The front pullover is knitted from the left sleeve. When all the parts are connected, you can start stitching the elements. First, the sleeves are sewn together and the shoulder seams are made. Next, the sides of the pullover are stitched.
How to create a simple and warm cross-knit hat
For an example of the study of cross-knitting, we suggest knitting a fashionable and very stylish hat - a beanie. It is these hats that are very popular now.

To knit hats you will need:
- Yarn - 100g;
- Circular knitting needles - No. 7.
This hat used all the yarn - one skein. If you want to get a not so tight knit as a result, then you can take knitting needles numbered 8.5 or 9.
Let's start knitting. On the needles, you need to cast on 30 loops. The first two rows are knitted with garter stitch to the end. All loops are knit. Do not forget that the first loop and the last edging. We knit the third row with a shortened row, consisting of one edge loop, then 23 front loops, and at the end we leave 6 loops not knitted. Loops can be left either five or seven, depending on how deep you want the wedge to be.
In order not to get holes for honey 24 and 25 loops, it is necessary to remove 25 loop on right spoke... Next, knitting should be turned over and 24 knit stitches should be tied. The next row is knitted like this: one edge loop, 24 front loops and then leave five loops not knitted. When the first wedge of the cap is tied, the rounding is already visible. We need to tie 7 wedges. The total width should be 46 cm.At the end, on all 30 loops, you need to knit 2 rows of front loops and close all the loops. The result should be a great beanie.

A scarf - snood can be knitted to a hat using the same technique.
You can even make a coat with cross knitting. In order to study the patterns and patterns of this warm thing, as well as the features of knitting, we suggest watching a video that reveals this topic.
Related videos
Cross knitting has gained incredible popularity in our time. In the article we will learn how to knit things with knitting needles in the transverse technique.
With cross knitting, it is possible to create original, beautiful things for both children and women.
Original vest
With this knitting technique, you can get an interesting vest:
We will need Bouton d "Or: 8/9/10 / 11/12 skeins of Surya (55% bamboo rayon, 45% soy, 156 m / 50 g) green gray (005); needles # 3 and No. 3.5; additional spoke.
We make 4 front loops, crossed to the left: remove two loops for additional. a knitting needle placed in front, the next two loops are knitted by persons., then two loops with additional. knitting needles of faces.
8 front loops, crossed to the left: remove four loops for additional. a knitting needle placed in front, the next four loops are knitted by persons., then 4 loops with additional. knitting needles of faces.
8 knit stitches crossed to the right: remove four stitches. for add. a knitting needle placed at the back, the next four loops are knitted by persons., then 4 loops with additional. knitting needles of faces.
Needle needles number 3.5: 34 p. And 37 p. = 10 x 10 cm.

Back. Cast on 90/95/98/102/109 stitches on needles # 3 and knit with elastic 1/1. We knit one row at a height of 3 cm. out. loops on the out. on the needles number 3.5, adding 32 loops evenly. It turns out 122/126/130/134/141 sts. Then we knit according to the scheme, making an increase on the left 15 × 1 loops in every second row. We get 137/141/145/149/156 loops. At a height of 21.5 / 23 / 24.5 / 26/29 cm, close 2 loops on the right side to cut the neckline, then close in every second row 3 x 1 p., In every fourth row 2 x 1 p. Remains 130 / 135/138/142/149 sts. Knit 138 rows according to the pattern, then continue to knit mirror-like.

Front. We knit similarly to the back, except for the neck. At a height of 21.5 / 23 / 24.5 / 26/29 cm, close on the left side to cut the neckline 6 loops, then close in every second row 4 x 2 p., 7 x 1 p. Remains 116/121/124 / 128/135 stitches.
Assembly. At the bottom of the back, we cast on 137/147/157/167/185 stitches on the needles No. 3 and knit with an elastic band 1/1. At a height of 15 cm, close the loops, knit them according to the pattern. We carry out the bar in the same way at the bottom of the front. We carry out 1 shoulder stitch. Along the neckline, we cast on 156 loops on the needles No. 3 and knit with an elastic band 1/1. Close the loops at a height of 1.5 cm. We carry out the second shoulder seam, sew the sides and sleeves.
You can also knit a great coat. Here is the knitting pattern:


Cross Knit Pullover
For a pullover for women, you will need:
- half a kilo of thick yarn;
- knitting needles number 4;
- circular needles number 3.
Basic pattern: "Polish elastic": (the number of loops, a multiple of 4 + 3 sts.).
1 row: 3 persons. loops, 1 N. loops, 3 persons. loops; 2nd row: 1 persons. loop, 1 out. n., 3 persons. loops, 1 N. n., 1 person. NS.

Knitting density: 20.8 p. X 35 p. = 10 x 10 cm.
Pattern:
We knit from the beginning of the sleeve.
We collect 37 stitches and knit with the main pattern. For bevels, add 1 stitch from two sides in each fourth row 20 times (= 77 sts), in every second row 10 times (= 97 sts).
At a height of 54 cm, we collect 34 loops from both sides at once (= 165 stitches) and introduce new loops into the pattern. Then we knit 11 cm on all loops, after which we divide the work: for the back we leave 81 loops, we close 7 loops for the neckline, for the front - 77 p.
In front and back we knit separately 26 cm, then we collect 7 loops between them and knit 11 cm on them all.After that, we decrease the number of loops on both sides in the reverse order: we close 34 loops each, for bevels we decrease 1 loop in every second row 10 times, in every fourth row 20 times. At a height of 156 cm from the beginning, we close all the loops (= 37 p.).

Assembly. Along the edge of the neckline, we cast on 68 loops with knitting needles and knit five cm with the base pattern, but in the even rows of the pattern loop, the opposite is true: instead of the front one - the purl, instead of the purl - the front, five rows of the front surface, close the loops. Sew the sides and sleeves.
Beanie hat
Detailed instructions for knitting a hat with knitting needles can be seen below.
First, we knit the main element of the headdress - the crown, in the transverse direction. Next, along the long side of the main element, we collect loops and tie the bottom, making subtractions to the top of the cap. At the end, the loops remaining on the top of the head are pulled together and the cap is sewn along the back of the head.

In order for the seam on the back of the cap to turn out invisible, open loops of the main element should be sewn with a "knitted" seam, connecting the uncoiled first row and not closed loops of the last one. It will not be difficult to dissolve the loops of the first glad, if at the beginning you make a set using a crochet that easily dissolves.
We collect forty loops and knit the main part of the cap with a long strip with a "braid" pattern in the middle. The initial and extreme loops are edging, form them with a "chain".
From the hem, we knit the initial and last seven loops with garter stitch (we knit these loops with the front and in the purl and in the front rows).

We knit the next eleven rows face stitch and in the 25th front row we cross 16 loops from the second part of the central element of the cap. To do this, we knit the initial 8 loops with the front ones, remove the next 8 loops on an additional knitting needle and place them before work, knit the last eight loops with the front ones, then the loops from the additional knitting needle.
We repeat the pattern of weaves from the second to the 25th row five times, then we knit 12 rows with the front stitch. The finished main part of the cap should be equal in length to the circumference of the head. At the end, do not close the loops, reshoot them on an additional knitting needle.
We knit the bottom of the headdress. On the top of the finished element, we collect the loops, pulling from the edge of the loop onto the working needle. We collect the loops from the front side so that the row of edge loops is on the wrong side.

We knit the dialed loops with an elastic band 1 front x 1 purl, 11 rows. In the 12th row, we knit all the loops two at a time, collecting two front loops together and two purl ones together. Then we knit with an elastic band 1 × 1 four more rows, reduce all loops in half. Cut the working thread after knitting two more rows. Don't forget to leave a good length. We take a needle with a wide eye, insert and pull the end of the thread through the remaining loops and pull them together.

The most familiar look to us is longitudinal, when the model is knitted to the full width of the pattern vertically from bottom to top or from top to bottom. But very interesting effects can be achieved when knitting across - from one side seam to another. This technique is especially convenient when knitting models with a wide armhole and straight sleeves.

Principles of cross knitting. The technology of partial knitting is considered there, general rules execution of a skirt, jacket and pullover. The principles of execution do not depend on the knitting technique - on knitting or crocheting they are the same as in machine knitting, so the article will be an excellent help for understanding the knitting process and calculating increases-decreases.

After reading the theoretical course, it will be easier to understand how a women's pullover with long sleeves is knitted from the site rukodelie.by. The pattern used is a Polish (aka corrugated) elastic band - a structural pattern, in terms of extensibility, more similar to a regular front surface than an elastic band. Using calculations and principles, you can knit other models by cross knitting according to the same description.

Ideal for cross knitting. Simple elegant pattern - paths garter stitch(all rows are front loops), alternating with openwork tracks. See the description on the website
Cross knitting of a jacket with needles for a girl with openwork pattern at the bottom
Cross knitting, a jacket with knitting needles for a girl
How to knit a jacket with knitting needles for a girl when knitting crosswise from the left shelf to the right.
The size: 6 / 9-12 / 18 (2-3 / 4) years
Size in cm: 62/68 - 74/80 (86 / 92-98 / 104) cm.
Materials: 150-150 (200-200) g of DROPS BABY MERINO yarn (100% wool, 50 g / 175 m) in color A and 50 g in color B, needles 2.5 mm, hook 3.0 mm., 3 buttons.
Knitting density: 26 loops * 51 rows = 10 * 10 cm garter stitch.
Garter stitch: knit all rows with front loops.
Pattern: execute according to the scheme, the scheme is shown on the front side.
Advice! When we perform shortened rows, turn the part, remove the first loop without knitting and pull the thread.
How to knit a children's jacket with cross knitting needles:
Left shelf: cast on 62-68 (78-88) sts with 2.5 mm needles. thread A.
Knit 8 rows of garter stitch, starting at the front row.
Track. row (front side): 3 persons., knit the next 15 loops, at the same time pick 8 loops over them (make a yarn over), finish with knit = 70-76 (86-96) loops.
Track. row (out. side): persons. loops., knit all yarns on the back wall (twisted loop).
Then knit: 3 loops in garter stitch, pattern (= 23 loops), 44-50 (60-70) loops in garter stitch.
SIMULTANEOUSLY start to perform shortened rows (see knitting advice): * knit 30-32 (38-42) loops, twist, knit to the end of the row, knit the first 46-50 (57-65) loops, twist, knit to the end of the row, knit the first 64-70 (80-90) sts, twist, knit to the end of the row, knit all 70-76 (86-96) loops, twist, knit to the end of the row, repeat from *
At a height of 16-18 (19-20.5) cm from the typesetting edge (measure along the longest side), cut the thread (= side).
Sleeve: remove the first 41-45-52 (60-65) sts on an additional knitting needle.
Separately for the sleeve, cast on 40-45 (55-64) loops, knit 29-31 (34-36) loops of the left shoulder = 69-76 (89-100) loops.
Continue knitting from the front side: * knit the first 40-45 (55-64) loops with a garter pattern, knit to the end of the row, knit the first 63-70 (83-94) loops with a garter pattern, turn, knit to the end of the row, knit all 69 -76 (89-100) sts in a garter pattern, turn, knit to the end of the row, repeat from * to a height of 16-17 (18-18) cm. From the set stitches (measure the longest side)
Back and second sleeve: close the first 40-45 (55-64) sts of the sleeve, return the deferred stitches back to the working knitting needles, put a mark on each side.
Continue to knit shortened rows on all loops as before.
At a height of 28-31 (35-37) cm from the mark (measure the longest side - the bottom of the jacket) remove the first 41-45 (52-60) loops on an additional knitting needle, knit the second sleeve as the first.
Right shelf: at a height of 16-17 (18-18) sts from the deferred stitches, close the stitches of the second sleeve and return the deferred stitches to the common knitting needle, put marks on each side of the work.
Continue to knit in shortened rows as before, wide as the left shelf.
Track. row: 3 persons., knit the next 23 loops with the front, at the same time subtract 8 loops above them (knit 2 together.), end the row with the front loops = 62-68 (78-88) loops.
Knit 3 rows of garter stitch.
In the next row on the front side, make 3 holes for buttons: 41-45 (53-61) persons., Yarn, 2 persons together., 7-8 (9-10) persons., Yarn, 2 persons together., 7- 8 (9-10), yarn, 2 persons together., 1 persons.
Knit 5 rows of garter stitch.
Close the loops.
Finishing: thread white and crochet the bottom of the jacket: 1 tbsp. b / n, * 3 w / p., 1 tbsp. s / n in the 3rd loop from the hook, skip 1 cm of the canvas, 1 tbsp. b / n, repeat from *.
Repeat the strapping for each sleeve.
Sew sleeve seams.

2 years ago
Whom will you surprise with a hat tied with an elastic band or vertical braids? Modern women of fashion who love free time spend it usefully, gradually master the cross knitting of the hats. It is on this topic that we will talk today.
A real woman should look irresistible in any weather. As soon as the cold falls on our heels, the first thing we get out of the closet is women's hat knitting needles. Cross knitting is familiar to many. In practice, this technique was used by many craftswomen. You just need to knit the canvas in shortened rows.
For more than one year, a beanie hat has been at the peak of popularity. This is not a specific style of headdress, most likely, bini is a collective concept. This is the name of any elastic hat without fasteners and ties. You can knit it in the shape of your head or in the shape of a stocking. Everyone chooses their own option.
The main advantages of cross knitting include the following:
- hidden seam;
- perfect hat shape;
- matching the headgear to the girth of the head;
- interesting drawing.
The easiest way is to knit a beanie hat with a front satin stitch. Due to the cross knitting, all the ribs will be vertical. It looks original and incredibly beautiful.
On a note! Before you start knitting a hat, you need to measure the circumference of your head. From the selected yarn, knit a sample of about 10x10 with knitting needles of the appropriate diameter and determine the knitting density. This is necessary for the most accurate calculation of the loops.

Necessary materials:
- plain or melange yarn - 1 skein;
- knitting needles of the appropriate diameter.
Step-by-step description of the process:
- In the classical way, we collect 58 stitches on the knitting needles.
- The first loop in a row is removed without knitting, the last one is tied with a purl loop. We will do this in each row.
- We knit the first six rows completely with front loops.
- From the next row, we begin to knit the first wedge. It is thanks to knitting of shortened rows that the cap fits the head, and you can definitely determine the appropriate size.
- We knit 50 stitches with the front stitch. We have eight loops left on the main knitting needle in this row, we will not knit them.
- Before deploying the product, we perform the following action: we throw the working thread in front of the canvas. Do this in front of the first stitch on the left knitting needle.
- We unfold the canvas to the wrong side. We also knit the next row with front loops. Now we knit one more buttonhole, that is, 51.
- We have seven loops left on the main knitting needle. Again, we throw the working thread in front of the canvas and unfold the product.
- In the next row we knit 52 loops. There are six loops left on the spoke.
- We unfold the product and continue to knit the hat only with front loops each row, capturing one more loop.
- In the ninth row, we knit all the loops, only the hem remains on the left knitting needle.
- We have the first wedge ready. From the 10th row, we begin to knit the second wedge according to the same principle. First, on the left knitting needle, leave eight untied loops and so on.
- We knit as many wedges as necessary for the size of the head.
- In the last row, we close all the loops. It remains to connect the side parts of the cap. The seam can be sewn with a needle or crochet.
Headpiece for a true lady
Every needlewoman can learn to knit a hat with crosswise oblique knitting needles. Basically in all knitted products braids are arranged vertically. But such a pattern is unlikely to surprise anyone. Horizontal braids look original and add extra volume to the headdress.
You will have a stylish knitted hat. Cross knitting, the patterns of which are quite simple, will appeal to you.

Necessary materials:
- yarn - 1-2 skeins;
- knitting needles of the appropriate size.
Step-by-step description of the process: